I thought I had coconut cream for this recipe, but it turns out I didn’t. Not wanting to go back to the store, I used lactose-free sour cream and water instead, and it turned out to be really good. You could add more or different vegetables if you have them; spinach, kale, roasted red peppers, tomatoes, etc. would all be good in here.

  • 2 lbs. free-range chicken, cooked and shredded (I cooked 1 breast and four drumsticks in a crock pot on low all day with an onion and some Trader Joe’s 21 seasoning salute and it was perfect)
  • 1 cup dry rice, cooked
  • 1 lb. broccoli, chopped into florets
  • 1 cup (about 8 large) white mushrooms, cut in half and sliced
  • 3 Tbs. butter
  • 1/2 cup yellow onion, chopped
  • 1 tsp. minced garlic
  • 12 oz. sour cream
  • 8 oz. water
  • 5 tsp. maharajah curry powder (I’m partial to the Spice House)
  • Red pepper flakes to taste
  • Salt and pepper

Preheat the oven to 375 degrees.

Combine the shredded chicken, cooked rice, broccoli, and mushrooms in a 9 X 13 casserole dish.

Melt the butter in a large pan. Add the chopped onion, and cook for 3-5 minutes or until clear. Add the garlic and cook for a little while longer. Mix the sour cream and water together, then add to the pan. Sprinkle in the curry powder, red pepper flakes, salt, and pepper. Combine and warm until you have a nice sauce.

Pour the sauce over the chicken and vegetables. Mix together and cook in the oven for about 20 minutes. Brown it under the broiler for a couple minutes before serving.

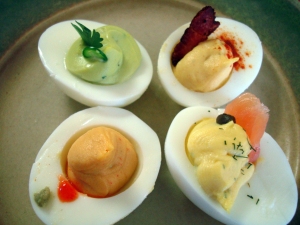
These tasty appetizers require a little bit of a time commitment, but the result is worth it. I like to boil and peel the eggs ahead of time, and even sometimes make the filling early but not fill the eggs until just before serving. Let me know what other varieties you have made or have in mind — I’d love to try them!

From top left: avocado, traditional, smoked salmon, and wasabi-Srirach deviled eggs.

Clockwise from top right: traditional, smoked salmon, wasabi-Sriracha, and avocado deviled eggs.

  • 9 hard-boiled eggs (see note)
  • 1/2 cup mayonnaise

Cut the eggs in half. Combine the egg yolks and mayonnaise (I like using an immersion blender) until it is a smooth consistency. Choose from one of these flavors, or create your own!

Traditional

  • 1 Tbs. dijon mustard
  • 1 tsp. lemon juice
  • Salt and pepper to taste
  • 1/4 tsp. paprika, plus some for garnish
  • 18 pieces cooked bacon

Combine the mustard, lemon juice, salt, pepper, and 1/4 tsp paprika with the mayo-yolk mixture. Put the filling into a plastic sandwich bag. Cut off a corner of the bag and pipe the filling into each egg white half. Garnish with a piece of cooked bacon and a small dash of paprika.

Smoked salmon

  • 2 tsp. lemon juice
  • 1 tsp. dried dill, plus some for garnish
  • Salt and pepper to taste
  • 18 slices smoked salmon
  • 18 capers

Combine the lemon juice, dill, salt, and pepper with the mayo-yolk mixture. Put the filling into a plastic sandwich bag. Cut off a corner of the bag and pipe the filling into each egg white half. Garnish with a slice of the smoked salmon, a caper, and a small dash of dill.

Wasabi-Sriracha

  • 1 – 2 tsp. wasabi paste, plus some for garnish
  • 1/2 – 1 Tbs. Sriracha, plus some for garnish
  • Salt and pepper to taste

Combine the wasabi paste, Sriracha, salt, and pepper with the mayo-yolk mixture. Taste and add more of the wasabi and Sriracha if you want a stronger flavor. Put the filling into a plastic sandwich bag. Cut off a corner of the bag and pipe the filling into each egg white half. Garnish with a dot each of wasabi paste and Sriracha.

Avocado

  • 1/2 small avocado
  • 1 Tbs. lime juice
  • 2 Tbs. chopped fresh cilantro
  • Salt and pepper to taste
  • 18 slices jalapeño or serrano pepper
  • 18 sprigs fresh cilantro

Combine the avocado, lime juice, chopped fresh cilantro, salt, and pepper with the mayo-yolk mixture. Put the filling into a plastic sandwich bag. Cut off a corner of the bag and pipe the filling into each egg white half. Garnish with a slice of pepper and a sprig of cilantro.

NOTE: We’ve found the best method for boiling eggs is to bring a large pot of water to boil, then add room-temperature eggs. Bring back to a boil for one minute, then turn off and cover for another 12 minutes. Drain the eggs, immediately put them into an ice bath until cold. They should peel easily and have fully-cooked but not overdone yolks.

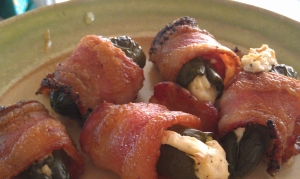
I had a surprisingly large harvest of jalapeño peppers when I cleaned out the garden this weekend, so we decided to make some poppers. They are a little time consuming to prepare, but I did a large batch and am freezing some of the stuffed peppers (not wrapped in bacon yet). We will see if they thaw and cook as well as the fresh when we do them up for a Lions-Packers halftime snack on Thanksgiving.

Hot, cheesy, wrapped in bacon, with a little kick.

Hot, cheesy, wrapped in bacon, with a little kick.

  • 36 jalapeño peppers
  • 8 oz. cream cheese
  • 1 tsp. salt
  • 1/4 tsp. fresh ground black pepper
  • 2 tsp. minced garlic
  • 18 strips bacon

Wash the peppers. Using a paring knife, cut off the stems and make a long slice down one side of the pepper. Take the tip of the knife and carefully clean out the insides of the pepper. Leave more of the pith if you want a hotter pepper. Discard the insides and be very careful — your hands are full of the jalapeño oils at this point. Do not rub your eyes, put in your contacts, or let your dog lick your fingers. Please.

Mix the cream cheese, salt, pepper, and garlic. With a butter knife, stuff the peppers with the cream cheese mixture. (You can be creative here, mix in some chives, basil, or other herbs if you’d like.)

Cut the strips of bacon in half and wrap one half strip around each stuffed pepper. Secure with a toothpick. If you have a grill going, you can line them up on a skewer.

Bake on a slotted pan at 375 until bacon is fully cooked, about 30 minutes. Or put on the grill and cook until done. You might want to put them under the broiler for a moment to get a good crisp. Let cool slightly before eating.

Adapted from P.B. Alehouse (Rattlesnakes)

I saw the original version of this recipe in the U-T San Diego paper, and we happened to have some beef short ribs in the freezer at the time. I’ve made it a few times since and it is a great recipe to make on the weekend and heat up after work. It goes well over rice or alone in a wide, deep pasta bowl.

  • 4-5 lbs grass-fed, bone-in beef short ribs
  • 2 1/2 tsp. salt
  • 1 tsp. ground black pepper
  • 1 Tbs. olive oil
  • 4 Tbs. Kerrygold unsalted butter, divided
  • 3-6 cloves garlic, minced (we like a lot of garlic flavor and use 6)
  • 3 large red onions, halved and sliced thinly
  • 1 tsp. chipotle chili powder
  • 2 Tbs. dark brown sugar, divided (optional)
  • 1 Cup beef stock
  • 1 tsp. Worcestershire sauce
  • 16 oz. gluten-free beer (we’ve had success with Redbridge; original recipe calls for a porter or stout though)
  • 1 tsp. dried thyme leaves
  • 2 bay leaves
  • 1 Tbs. apple cider vinegar

Season the short ribs with 2 teaspoons salt and pepper. Cover loosely with plastic wrap on a rimmed baking sheet and refrigerate for at least 2 hours but preferably overnight.

Bring meat to room temperature. Pat the meat dry with a paper towel if damp. In a large Dutch oven melt 2 tablespoons butter and 1 tablespoon olive oil over medium-high heat. Sear the ribs on all sides until nicely browned. Transfer browned ribs to a plate. Add the remaining butter, and when it melts, add the onions and garlic. Cover and cook, stirring often over medium heat until the onions are very soft and a deeply browned, about 20 to 25 minutes. Stir in the chili powder and 1 tablespoon of the optional brown sugar. Cook, stirring continuously for 1 minute. Add the beef stock and bring to a boil, scraping up any browned bits from the bottom of the pan with a wooden spoon. Add the Worcestershire sauce, the beer, thyme, bay leaves, and ½ teaspoon salt. Stir and bring to a boil. Remove the pan from the heat and return the ribs and any accumulated juices to the Dutch oven.

Cover and cook the ribs in a preheated 325 degree oven for 2 to 21/2 hours until the meat is silky and fork tender and ready to fall from the bone. Remove from oven and cool slightly. Refrigerate overnight.

Before serving, return the Dutch oven, covered, to a preheated 325 degree oven until the ribs are heated through and the juices are bubbling — about 1 hour. Stir 1 tablespoon brown sugar and 1 tablespoon apple cider vinegar into the meaty juices and serve.

Recipe adapted from U-T San Deigo

It’s not very common for us to make or buy gluten-free versions of breads or other grain-based foods, despite the number of cookies, cakes, and other goodies on our recipe list. We compile the recipes for these rare occasions — times when we just have to have a taste of something we haven’t had in years.

There might be better crust recipes or mixes out there, but since we don’t make crusted pizza very often we have only tried Bob’s. Let me know if you have a variation that you like better and the next time we’re drooling for a pie we’ll give it a try! We might even try making a meatza version of this recipe some day.

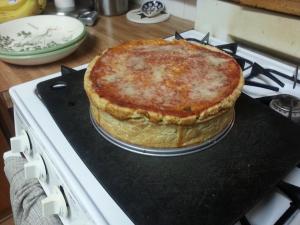
Thick and hearty deep-dish pizza. Now THAT is a pie!

Thick and hearty deep-dish pizza. Now THAT is a pie!

  • 1 recipe of Bob’s Red Mill Gluten-Free Pizza Crust (see note below)
  • 1 can pizza sauce. Try to avoid sauces with sugar and vegetable oils. I use Trader Joe’s organic tomato sauce, then add minced garlic, oregano, basil, onion powder, salt, pepper, red pepper flakes, and a touch of olive oil.
  • 6 oz. sliced low-moisture, whole milk mozzarella cheese (you want a dryer cheese or else you’ll have a soupy pizza)
  • 3/4 lb. sliced pepperoni, ham, crumbled sausage, or other meat
  • Sliced or diced onion, olive, mushroom, peppers, artichoke hearts, pineapple, or whatever toppings you like
  • Grated parmesan cheese
  • 9-inch springform pan, plus a cookie sheet or 9-inch cake pan

Preheat the oven to 425 degrees. Grease the bottom and sides of the springform pan with olive oil. Do the same with a 9-inch circle of the cookie sheet or the 9-inch cake pan. Press about half of the dough into the springform pan and up the sides, using wet hands. NOTE: Get it as thin as you can, as Bob’s mix puffs up a lot when cooking and becomes quite a thick crust. Don’t leave too much in the corner of the pan. Press some into just the bottom of the other pan as well for the top of the pie; you’ll likely have some dough left over. Since the crusts are pre-baked, the lid doesn’t adhere to the bottom crust during the final bake so I’m thinking next time of “gluing” them together with some of the leftover dough before doing the second bake. Bake the two crusts for about 8 minutes, then remove from the oven.

Reduce oven temperature to 375 degrees. Put a layer of mozzarella cheese along the bottom of the main crust. Then layer meat, toppings, and sauce. Repeat until the crust is full.

Put the top crust over the filled pie (maybe put a little of that extra dough around the edge of the bottom first to get them to bind). Top it with a little more sauce and some grated Parmesan cheese.

Bake for about half an hour. Let it sit for a few minutes before cutting. Use a very sharp knife and a sawing motion or everything will just slip and slide out. Leftovers are great reheated!

I used to have a big kieffer pear tree in the front yard of the house I rented in Michigan. It produced hundreds of pounds of crisp, sweet, juicy pears every fall. I fermented most of them into cider, but would always grab some here and there for a snack. Now whenever I see pears in the market I think of that tree and how much I miss it, and here’s something I always meant to try with the harvest. I finally made this easy dessert over the weekend with some bosc pears. They worked well, but I bet the crisp keiffers would be even better!

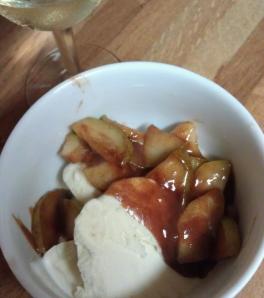
Enjoy the warm, sweet pears over cold ice cream.

Enjoy the warm, sweet pears over cold ice cream.

  • 1 large pear, cored, quartered, and sliced into thin pieces
  • 2 Tbs. butter
  • 1 Tbs. honey
  • 1/2 tsp. cinnamon
  • Ice cream, pancakes, etc.

Melt the butter in a small frying pan over medium heat. Add the butter and cinnamon, stir until combined. Toss in the pears and lower the heat. Cook and stir until the pears soften. Serve over cold vanilla ice cream, banana pancakes, or whatever else sounds good to you. Serves two.

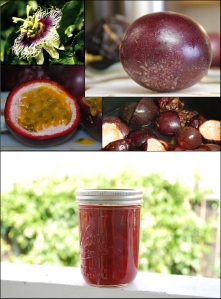
I’m lucky enough to have a yard bursting with edible plants: an apricot tree, a huge rosemary bush, some sage and lavender, baby lemon and lime trees, and my favorite — a passion fruit bush. All summer (and a little through the winter, too) it blooms with some incredible, vibrant flowers. Once the green passion fruits ripen, they turn an incredible, deep, rich purple and the fruit is full of fragrant orange pulp with dark seeds. The pulp can be strained for the juice, but the real magic happens with the rind.

passionfruitpreserves

From vine to jar.

  • 6 ripe passion fruits
  • 1 lemon
  • filtered water
  • Honey to taste
  • Pectin or unflavored gelatin (optional)

Cut the fruit in half and scoop the pulp into a mesh strainer over a bowl. Place the rinds into a saucepan or large pot and cover with filtered water; add the juice of the lemon. Bring to a boil and simmer, tightly covered, for 1 1/2 hours or until the flesh has plumped to twice its original size and is a deep purple hue.

Remove the rinds, keeping the liquid into the pot. Scoop out the soft flesh and discard the hard peel. Chop the flesh into smaller pieces and return it to the liquid with the honey. Passion fruit can be kind of bitter, so add as much honey as you want to cut the bitterness. Bring the liquid back to a boil for another five minutes.

Passion fruit rind, like apple peel, has a pretty high pectin content, which is drawn out by the citric acid in the lemon juice. I usually add a teaspoon or so of unflavored gelatin to the last boil to help it all set, but if you’re planning to give some to a vegetarian you can either add some more pectin (find it near the canning supplies at the store) or just go without and have a little soupier jar of preserves.

Remember that pulp you strained over a bowl in the beginning? Mash it around a little to get the juice out and dump the seeds. Mix the juice with another sweeter juice (again, it’s a little bitter) and enjoy a tropical drink. If you let it settle in the fridge for a day or so, the syrup separates and you can pour off the clear part and use the concentrated flavor in an ice cream or sorbet base. Got any other ideas for it? Let me know in the comments!

Adapted from Pickles, Jams, & Preserves

Inspired by Trader Joe.

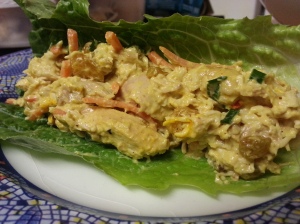
Choose a bold curry blend; we like maharajah. Golden raisins are also key for just a hint of sweetness.

Choose a bold curry blend; we like maharajah. Golden raisins are also key for just a hint of sweetness.

  • 2 whole chickens; brined, smoked, cooled, and chopped -OR- 2.5 pounds of trimmed chicken meat
  • 1-1 1/2 cups mayonnaise (start with less, add more if you need it)
  • 1 1/2 cup matchstick carrots
  • 1 1/2 cup golden raisins
  • 1 1/2 cups cashews
  • 1/2 cup chopped green onion
  • 2.5 Tbs. maharajah curry (we like the blend from The Spice House in Chicago); add more to taste
  • 2 tsp. freshly ground pepper

Mix everything together and chill. Serve on chopped lettuce as a salad or in romaine hearts. Don’t forget to make stock from the chicken bones.

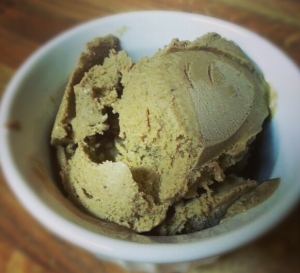
Want to know what it feels like to have Christmas punch you in the mouth? Take a bite and find out.

Want to know what it feels like to have Christmas punch you in the mouth? Take a bite and find out.

DISCLAIMER: This recipe doesn’t really adhere to our principles just based on the amount of sugar in it. It’s sweet. You can cut down on the brown sugar, for sure, but the molasses is pretty integral to the gingerbread flavor. Once in a great while we go out of bounds and indulge, and for the holidays (since we’re now living 2500 miles from our families and their gluttonous feasts) we decided to make a deviation. This isn’t a recipe for everyday, but it’s a gluten-free, dairy-free recipe that is delicious and deserves to be shared. Enjoy!

  • 1 1/2 cups heavy cream
  • 1 1/2 cups whole milk
    NOTE: 
    You can use two cans of full-fat coconut milk (and omit the cream and whole milk) for a non-dairy ice cream; it’s a little over 3 cups, so just add a dash more of each spice to compensate.
  • One 3-4 inch piece fresh ginger, peeled and roughly chopped; or 1 Tbs. chopped or minced ginger from the jar
  • 6 large egg yolks
  • up to 1/2 Cup packed light brown sugar
  • up to 1/4 Cup molasses
  • 2 tsp. ground ginger
  • 2 tsp. ground cinnamon
  • 1/2 tsp. ground cloves
  • 1/2 tsp. freshly nutmeg
  • 1/4 tsp. salt
  • 2 tsp. vanilla extract

In a medium saucepan, combine the heavy cream and milk (or coconut milk), and fresh ginger. If using minced or chopped ginger from a jar, put it in a metal mesh tea steeping bag; I have one for mulling spices that I dropped into the milk, this way you can pull the ginger out even if it’s not in chunks. Bring to a boil over medium-high heat. Remove the pan from the heat and set aside to infuse for 30 minutes to an hour, then either strain the mixture or remove the mulling container, discarding the ginger. Return the mixture to the saucepan and heat just until it comes to a simmer.

Meanwhile, whisk the egg yolks, brown sugar, molasses, ginger, cinnamon, cloves, nutmeg and salt in a heatproof bowl. Slowly add the warm milk mixture to the egg yolks, whisking constantly. Pour back into the saucepan and set over medium-low heat. Stir constantly until the mixture thickens enough to coat the back of a wooden spoon (about 170-175 F on an instant read thermometer).  Strain the custard into a heatproof bowl and stir in the vanilla.

Cover and refrigerate until thoroughly chilled (overnight is good). Freeze in your ice cream maker according to the manufacturer’s instructions.  Transfer to airtight container and freeze until firm, at least 1 hour. Combine with gingerbread cookies for an awesome ice cream sandwich.

Adapted from Tracy’s Culinary Adventures

I stumbled upon this gingerbread cookie recipe and it has found a permanent home in my virtual holiday recipe box. I don’t think I’ve ever had a gingerbread cookie, grain-free or not, that is as well-rounded as this one. It’s intensely flavored, dense, and just the right amount of chewy. Just don’t overcook them — they can go from done to charred in a quick minute.

Gingerbread cookies and a fancy (spiked?) coffee... Santa might never leave.

Gingerbread cookies and a fancy (spiked?) coffee… Santa might never leave.

  • 3 1/2 Cups almond meal (I use Trader Joe’s)
  • 1/2 Cup arrowroot powder
  • 1 tsp. cinnamon
  • 1 tsp. ground ginger
  • 1/2 tsp. cloves
  • 1/2 tsp. salt
  • 1/2 tsp. baking soda
  • 1/4 tsp. nutmeg
  • up to 1/2 cup molasses
  • up to 1/2 cup honey
  • 3 Tbs. coconut oil

Preheat oven to 350 degrees. Line two cookie sheets with parchment paper.

Combine almond meal, arrowroot powder, spices, salt, and soda in a large bowl. Mix it well to evenly distribute all the spices.

In small saucepan, heat molasses until just boiling. Remove from heat and stir in honey and coconut oil. Pour over almond mixture and mix well. Divide dough between cookie sheets and press into a rectangle with a greased spatula or spoon until about 1/4 inch thick. Bake for 10 minutes.

Let cool for a few minutes before cutting into shapes. Combine with gingerbread ice cream and freeze for ice cream sandwiches.

Recipe adapted from fastpaleo.com.